0. 更新记录
- 2025-03-25
- 增加小节
3.4.3. 问题3:esc键失效
- 更新小节
3.5. 安装 electron-builder
1. 前言
- 起因,是在
第五次龙架构双周会 上看到了一个 悬赏任务:移植 国家中小学智慧教育平台 的桌面端客户端到龙架构,使龙芯平台能够原生运行。
- 该任务的奖励是一台龙芯
3A6000 笔记本,或一台龙芯 3A6000E 主机。由于我的确非常想要一台 3A6000 笔记本,遂决定接下该任务。
- 任务并不复杂,但我在移植中也遇到了诸多问题,花费了一周中的的晚间时间。这是我第一次接触
Electron 应用开发,若有纰漏,欢迎大家指正
- 感谢在移植过程中为我提供帮助的各位。
2. 检查应用
3. 旧世界(ABI1.0)移植
3.1. 安装 Nodejs
该部分可参考龙芯官网相关文档。
下载:
$ wget http://ftp.loongnix.cn/nodejs/LoongArch/dist/v16.20.2/node-v16.20.2-linux-loong64.tar.gz
解压:
$ sudo mkdir /usr/local/nodejs
$ sudo tar -zxvf node-v16.20.2-linux-loong64.tar.gz -C /usr/local/nodejs
设置环境变量:
验证安装:
$ node --version
v16.20.2
$ npm --version
8.19.4
3.2. 安装 Electron
该部分可参考龙芯官网相关文档。
创建一个空文件夹并进入:
$ mkdir -p ~/port/clean-build-abi1.0
$ cd ~/port/clean-build-abi1.0
设置 npm 镜像仓库地址:
$ npm config set registry https://registry.loongnix.cn:4873
验证设置是否成功:
$ npm get config registry
config=undefined
registry=https://registry.loongnix.cn:4873/
若不成功,可删除 ~/.npmrc 文件后再试。
设置环境变量:
$ export ELECTRON_MIRROR=http://ftp.loongnix.cn/electron/LoongArch/
$ export electron_use_remote_checksums=1
安装:
$ npm install electron@22.3.27 --save-dev
检查安装:
$ npx electron --version
v22.3.27
3.3. 解包应用
将应用在 Windows 平台上安装后,拷贝 app.asar 文件与 asset 文件夹到之前创建的目录中。
- 位置:
C:\Program Files\zxxedu\resources
安装 asar 工具:
$ npm install asar --save-dev
解包应用:
为了使解包后的应用能找到正确的文件路径,需要修改目录结构:
- 创建一个名为
prebuild 的文件夹。
- 将
source/dist 中的两个文件夹移出到当前目录下的 prebuild 文件夹中。
- 将
prebuild 文件夹中原本命名为 main 的文件夹改名为 dist。
$ mkdir prebuild
$ mv source/dist/* prebuild/
$ mv prebuild/main/ prebuild/dist
应用目前的目录结构应当如下所示:
3.4. 尝试运行
修改 package.json 文件,在最外层大括号内添加如下内容:
  "main": "./prebuild/dist/main.js",
  "scripts": {
  "start": "electron ."
},
尝试运行:
$ npm start
3.4.1. 问题1:日志中的 Error
3.4.2. 问题2:托盘菜单无法弹出
观察应用,发现在 Windows 上的程序托盘图标,在 Linux 平台上不出现。
- 原因:资源文件路径错误,导致程序找不到托盘图标所在的路径。
观察应用,发现在 Windows 上的程序托盘右键菜单,在 Linux 平台上无法呼出。
可能是由于下方的 AppTray.tray.popUpContextMenu(contextMenu) 方法未生效导致的。
也有可能是 right-click(右键单击) 事件未获取到导致的。
此时,查询 Electron 官方文档:
很遗憾地发现,这两处代码都不支持 Linux 平台。
- 文档标题旁仅有
Windows 和 macOS 的字样。
因此,该函数必须重写,以正确唤起托盘右键菜单。
经查阅文档,找到解决办法:
- 将唤起菜单的代码加入
click(左键单击) 事件中,以达到目的。
- 使用
screen.getCursorScreenPoint() 方法获取鼠标坐标。
- 使用
menu.popup() 方法唤起托盘菜单,并传入鼠标坐标。
修改后的完整的代码如下:
- 可在
main.js 中搜索 click 关键字找到相关逻辑。
- 其中的
external_electron_ 等价于 require() 方法。
TrayWindow.appTray.tray.on('click', () => {
    TrayWindow.toggleWindow({
      showMainWinWhenEmpty: true
    });

    # 以下为新增代码
    const defaultMenu = [{
      label: '打开主界面',
      click: () => {
        window.show();
        window.focus();
      }
    }, {
      label: '重新启动',
      click: () => {
        external_electron_.app.relaunch();
        external_electron_.app.exit(0);
      }
    }, {
      label: '退出',
      click: () => {
        external_electron_.app.exit(0);
      }
    }];
    const contextMenu = external_electron_.Menu.buildFromTemplate(defaultMenu);
    const cursorPosition = external_electron_.screen.getCursorScreenPoint();
    const { x, y } = cursorPosition;
    contextMenu.popup({
        x: Math.round(x),
        y: Math.round(y),
    });
  });
为了方便起见,我将代码整合为一个补丁,0000-fix-tray-menu-can-not-pop-up-on-linux.patch 文件,并放在本文末尾。
将该补丁文件与 prebuild/dist/main.js 文件放置在一起,并执行:
$ patch main.js < 0000-fix-tray-menu-can-not-pop-up-on-linux.patch
补丁的制作方法:
# main.js 为修改前的文件
# main.js.modified 为修改后的文件
# main.js.patch 为输出的补丁文件

$ diff -u main.js main.js.modified > main.js.patch
3.4.3. 问题3:esc键失效
经观察,发现使用 esc 键无法使应用内视频从全屏状态中退出。
当应用运行时,当前桌面环境下的所有应用均也无法使用 esc 键。
搜源码,发现应用注册了全局 esc 键事件,代码如下:
- 参考文档: globalShortcut
- 搜索关键词为
globalShortcut.register
export default function fixFullScreen(browserWindow) {
  globalShortcut.register('Escape', () => {
    if (!browserWindow.isDestroyed() && browserWindow.isFocused()) {
      if (browserWindow.fullScreenable) {
        return
      }
      // 这个模式下ESC无法退出全屏,所以这里手动退出
      browserWindow.webContents.executeJavaScript(`
        if(document.fullscreen) {
          document.exitFullscreen()
        }
      `)
      // browserWindow.webContents.tri
    }
  })
}
说实话,我没有看懂这个子程序的作用何在,尤其是前两个 if 处。
于是,我尝试在代码中直接屏蔽掉这个注册按键的函数,即注释掉如下这行:
fixFullScreen(this.window);
经测试,屏蔽函数后 esc 键工作正常,且并未出现“ESC无法退出全屏”的情况。
我也将该部分整合为一个补丁,0001-remove-fullscreen-hack.patch 在本文末尾一同分享出来。
将该补丁文件与 prebuild/dist/main.js 文件放置在一起,并执行:
$ patch main.js < 0001-remove-fullscreen-hack.patch
补丁的制作方法与上小节相同。
3.5. 安装 electron-builder
该部分可参考龙芯官网相关文档。
设置环境变量:
$ export ELECTRON_MIRROR=http://ftp.loongnix.cn/electron/LoongArch/
安装:
$ npm install electron-builder@22.14.13 --save-dev
检查安装:
$ npx electron-builder --version
22.14.13
使用包管理器安装 fpm 运行环境:
$ sudo apt install ruby ruby-dev rubygems build-essential rpm
安装 fpm:
$ sudo gem install --no-document fpm
设置环境变量,使用系统 fpm:
$ export USE_SYSTEM_FPM="true"
2025-03-25更新
由于龙芯官方 Ruby` 软件包升级,以上方法可能不适用。
出现的错误如下:
$ sudo gem install --no-document fpm
Fetching: rexml-3.4.1.gem (100%)
Successfully installed rexml-3.4.1
Fetching: stud-0.0.23.gem (100%)
Successfully installed stud-0.0.23
Fetching: dotenv-3.1.7.gem (100%)
ERROR:  Error installing fpm:
	The last version of dotenv (>= 0) to support your Ruby & RubyGems was 2.8.1. Try installing it with `gem install dotenv -v 2.8.1` and then running the current command again
	dotenv requires Ruby version >= 3.0. The current ruby version is 2.5.0.
katyusha@L860-T2:~/port/clean-build-abi1.0$ sudo gem install --no-document fpm
ERROR:  Error installing fpm:
	The last version of dotenv (>= 0) to support your Ruby & RubyGems was 2.8.1. Try installing it with `gem install dotenv -v 2.8.1` and then running the current command again
	dotenv requires Ruby version >= 3.0. The current ruby version is 2.5.0.
经观察,发现是 ruby 软件包版本不够新,目前安装的是 2.5.0 版本,但需要 >= 3.0 版本。
检查当前源中的 ruby 软件包版本:
$ apt info ruby
Package: ruby
Version: 1:2.5.2
Priority: optional
Section: ruby
Source: ruby-defaults
Maintainer: Antonio Terceiro <terceiro@debian.org>
Installed-Size: 37.9 kB
Provides: irb, rdoc, rubygems
Depends: ruby2.5
Suggests: ri, ruby-dev
Conflicts: ruby-activesupport-2.3, ruby-activesupport-3.2
Breaks: apt-listbugs (<< 0.1.6), rbenv (<= 0.4.0-1), ruby-debian (<< 0.3.8+b3), ruby-switch (<= 0.1.0)
Replaces: irb, rdoc, rubygems
Homepage: http://www.ruby-lang.org/
Download-Size: 11.4 kB
APT-Manual-Installed: yes
APT-Sources: https://pkg.loongnix.cn/loongnix DaoXiangHu-stable/main loongarch64 Packages
Description: Interpreter of object-oriented scripting language Ruby (default version)
 Ruby is the interpreted scripting language for quick and easy
 object-oriented programming.  It has many features to process text
 files and to do system management tasks (as in perl).  It is simple,
 straight-forward, and extensible.
 .
 This package is a dependency package, which depends on Debian's default Ruby
 version (currently v2.5).
再次检查龙芯社区官网,发现其 Ruby 安装教程有更新。
以下步骤为参考官方教程,使用 rvm 工具安装新版本 ruby。
安装
$ curl -sSL https://github.com/loongson/rvm/releases/download/1.29.12-loongarch64/rvm-install | bash -s stable
得到提示,根据该提示将 rvm 工具导入环境变量(临时生效)
$ source $HOME/.rvm/scripts/rvm
查看支持的 ruby 版本
$ rvm list known
# MRI Rubies
[ruby-]2.7[.7]
[ruby-]3.0[.5]
[ruby-]3.1[.3]
[ruby-]3[2.1]
安装新版本 ruby 并切换版本
$ rvm install 3.1.3
rvm use 3.1.3
如果安装时出现问题,可手动添加环境变量,指向新版本 ruby 所在的目录,例如:
$ export PATH="$HOME/.rvm/rubies/ruby-3.1.3/bin:$PATH"
再次尝试安装 fpm
$ gem install --no-document fpm
安装成功!
3.6. 打包
编辑 package.json 文件:
{
	"name": "zxxedu",
	"version": "1.3.6",
	"description": "智慧中小学",
	"license": "ISC",
	"homepage":"https://basic.smartedu.cn",
	"author": {
		"name": "moe.edu.cn",
		"email": "ncetbgs@moe.edu.cn"
	},
	"main": "prebuild/dist/main.js",
	"scripts": {
		"start": "electron .",
		"build": "electron-builder"
	},
	"build": {
		"appId": "zxxedu",
		"productName": "智慧中小学",
		"extraResources": [
			{
				"from": "asset", # 将当前目录下的 asset 文件夹放入打包后的 resource 文件夹
				"to": "asset"
			}],
		"linux": {
			"target": [
				"deb", # 生成 deb 包
				"rpm" # 生成 rpm 包
			],
			"icon": "asset/app/", # 使用原应用的图标,文件名中必须带有图片尺寸信息,如:32、32x32
			"category":"Network" # 应用分类
		},
		"electronVersion": "22.3.27",
		"electronDownload": {
			"mirror": "http://ftp.loongnix.cn/electron/LoongArch/", # 使用龙芯提供的 electron 镜像
			"customDir": "v22.3.27"
		}
	}
}
打包:
$ npm run build
3.7. 安装
4. 新世界(ABI2.0)移植
4.1. 安装 Nodejs
由于 Nodejs 16 上游源码未合并龙架构支持,直接编译会遇到一些问题。
为了方便起见,这里选择 白老师(xen0n) 移植的代码仓库。
拉取代码:
git clone https://github.com/loongson-community/node-16
由于 Loongnix 25 自带的 Python 版本为 3.12 ,晚于 Nodejs 16 发布时间,直接编译时会提示不支持 Python 3.12 ,因此修改一下构建脚本:
$ cd node-16/
$ vim configure

# 将第26行改为如下内容:
acceptable_pythons = ((3, 12), (3, 11), (3, 10), (3, 9), (3, 8), (3, 7), (3, 6))
由于 Nodejs 16 依赖的 openssl 版本未合并龙架构支持,直接编译时会遇到 openssl 的错误,cc: error: unrecognized command-line option ‘-m64’。
这里选择使用系统自带的 libssl-dev 库,采用动态链接的方式编译:
$ sudo apt install python3-pip
$ pip3 install setuptools --break-system-packages
$ sudo apt install libssl-dev
$ ./configure --shared-openssl \
  --shared-openssl-includes=/usr/include \
  --shared-openssl-libpath=/usr/lib \
  --prefix=/usr/local/nodejs
$ make -j$(nproc)
$ sudo make install
3A6000编译耗时约30分钟。
real    30m5.358s
user    229m50.043s
sys     3m30.977s
设置环境变量:
$ export PATH="/usr/local/nodejs/bin:$PATH"
验证安装:
$ node --version
v16.20.2
$ npm --version
8.19.4
4.2. 安装 Electron
龙芯的工程师在新世界(ABI2.0)上移植了一份 Electron v22.3.27,并放出了二进制。
- 地址:
https://github.com/fedora-remix-loongarch/electron-bin/releases/
为了方便安装,我暂时将其二进制文件上传到自己的博客服务器上,作为一个临时的镜像仓库。
- 地址:
https://katyusha.net/temp/electron/LoongArch/
- > “自豪地采用 WordPress,并由 龙芯3C6000 提供强劲动力”
若想尝试自行编译新世界 Electron,可参考以下文档:
- 龙芯官方源码仓库(
≤25):https://github.com/loongson/electron/
- 龙芯工程师交叉编译文档:
https://xiao-tao.github.io/
- 社区开发者
darkyzhou 的原生编译文档:https://github.com/darkyzhou/electron-loong64
安装 Electron 的过程可参考旧世界文档,并简单调整。
- 注意,需替换
npm 镜像仓库的链接,以及 Electron 镜像仓库的链接
- 地址:
https://docs.loongnix.cn/electron/doc/list/02.%E5%AE%89%E8%A3%85%E8%AF%B4%E6%98%8E.html
创建一个空文件夹并进入:
$ mkdir -p ~/port/clean-build-abi2.0
$ cd ~/port/clean-build-abi2.0
设置 npm 镜像仓库地址:
验证设置是否成功:
$ npm get config registry
config=undefined
registry=https://registry.loongnix.cn:5873/
若不成功,可删除 ~/.npmrc 文件后再试。
设置环境变量:
安装:
$ npm install electron@22.3.27 --save-dev
检查安装:
$ npx electron --version
v22.3.27
4.3. 解包应用
4.4. 尝试运行并修复bug
4.5. 安装 electron-builder
安装 electron-builder 的过程可参考旧世界文档,并简单调整。
再次确认设置环境变量
安装:
$ npm install electron-builder@22.14.13 --save-dev
检查安装:
$ npx electron-builder --version
22.14.13
使用包管理器安装 fpm 运行环境:
$ sudo apt install ruby ruby-dev rubygems build-essential rpm
安装 fpm:
$ sudo gem install --no-document fpm
设置环境变量,使用系统 fpm:
$ export USE_SYSTEM_FPM="true"
4.6. 打包
- 编辑
package.json 文件:
- 注意,需替换
Electron 镜像仓库的链接为 https://katyusha.net/temp/electron/LoongArch/
- 其余部分与
2.6. 打包 内容相同
{
	"name": "zxxedu",
	"version": "1.3.6",
	"description": "智慧中小学",
	"license": "ISC",
	"homepage":"https://basic.smartedu.cn",
	"author": {
		"name": "moe.edu.cn",
		"email": "ncetbgs@moe.edu.cn"
	},
	"main": "prebuild/dist/main.js",
	"scripts": {
		"start": "electron .",
		"build": "electron-builder"
	},
	"build": {
		"appId": "zxxedu",
		"productName": "智慧中小学",
		"extraResources": [
			{
				"from": "asset", # 将当前目录下的 asset 文件夹放入打包后的 resource 文件夹
				"to": "asset"
			}],
		"linux": {
			"target": [
				"deb",
				"rpm"
			],
			"icon": "asset/app/", # 使用原应用的图标,文件名中必须带有图片尺寸信息,如:32、32x32
			"category":"Network" # 应用分类
		},
		"electronVersion": "22.3.27",
		"electronDownload": {
			"mirror": "https://katyusha.net/temp/electron/LoongArch/",
			"customDir": "v22.3.27"
		}
	}
}
4.7. 安装
5. 遇到的问题
5.1. Loongnix 25 兼容层误判二进制文件
5.1.2. 现象
在新世界使用 electron-build 打包时,出现了以下错误信息:
/lib/loongarch64-linux-gnu/libc.so.6: version `GLIBC_2.36' not found
观察日志,发现该错误是执行一个名为 app-builder 的二进制文件是发生的。
- 路径:
/home/katyusha/port/clean-build-abi2.0/node_modules/app-builder-bin/linux/loong64/app-builder
使用 file 检查该应用的 glibc 信息:
$ file /home/katyusha/port/clean-build-abi2.0/node_modules/app-builder-bin/linux/loong64/app-builder
ELF 64-bit LSB executable, LoongArch, version 1 (SYSV), dynamically linked, interpreter /lib64/ld-linux-loongarch-lp64d.so.1, BuildID[sha1]=a25f647fbc8c1a67ca47928e51cade981c951bac, for GNU/Linux 4.15.0, stripped
使用 ldd 检查系统的 glibc 信息:
$ ldd --version
ldd (Debian GLIBC 2.40-2) 2.40
这非常奇怪,因为 glibc 是向下兼容的,即系统中使用的高版本 glibc 兼容应用的低版本 glibc 。
结合龙架构的新旧世界问题,猜想该问题是由于 Loongnix 25 自带的旧世界兼容层导致的。
5.1.3. 排查
首先,尝试在 debian-port 执行该二进制文件,发现一切正常、
经群友 Icenowy 指点,使用 strace 工具追踪该二进制使用的系统调用,发现存在可疑信息:
openat(AT_FDCWD, "/usr/local/abi-compat/lib/loongarch64-linux-gnu/libc.so.6", O_RDONLY|O_CLOEXEC) = 6
猜想该旧世界兼容层是以软件包的形式安装在系统中的。
检查 dpkg 信息,发现系统中安装了一个名为 abi-compat 的软件包:
$ dpkg --list | grep abi
ii  abi-compat                              0.1                                  loong64      abi-compat
......
5.1.4. 解决
6. 运行效果
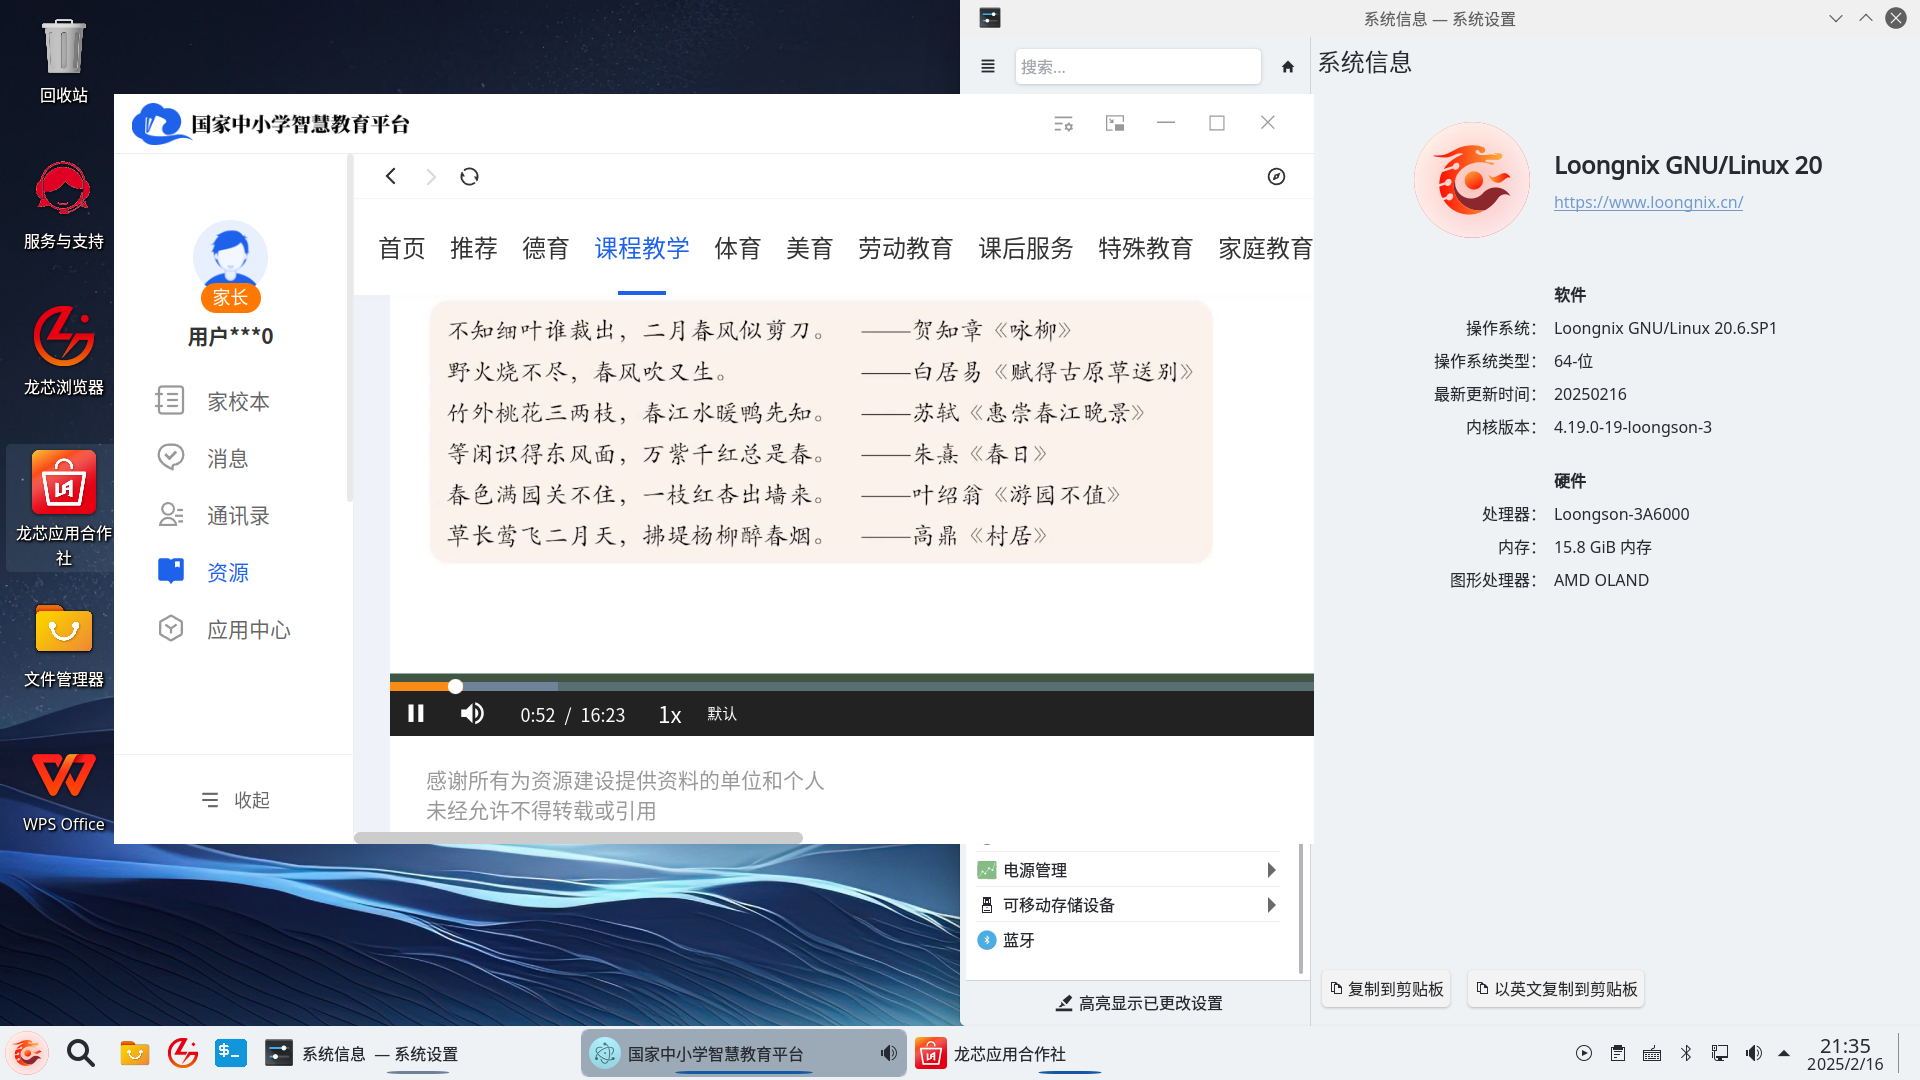
6.1. Loongnix 20 系统(旧世界)

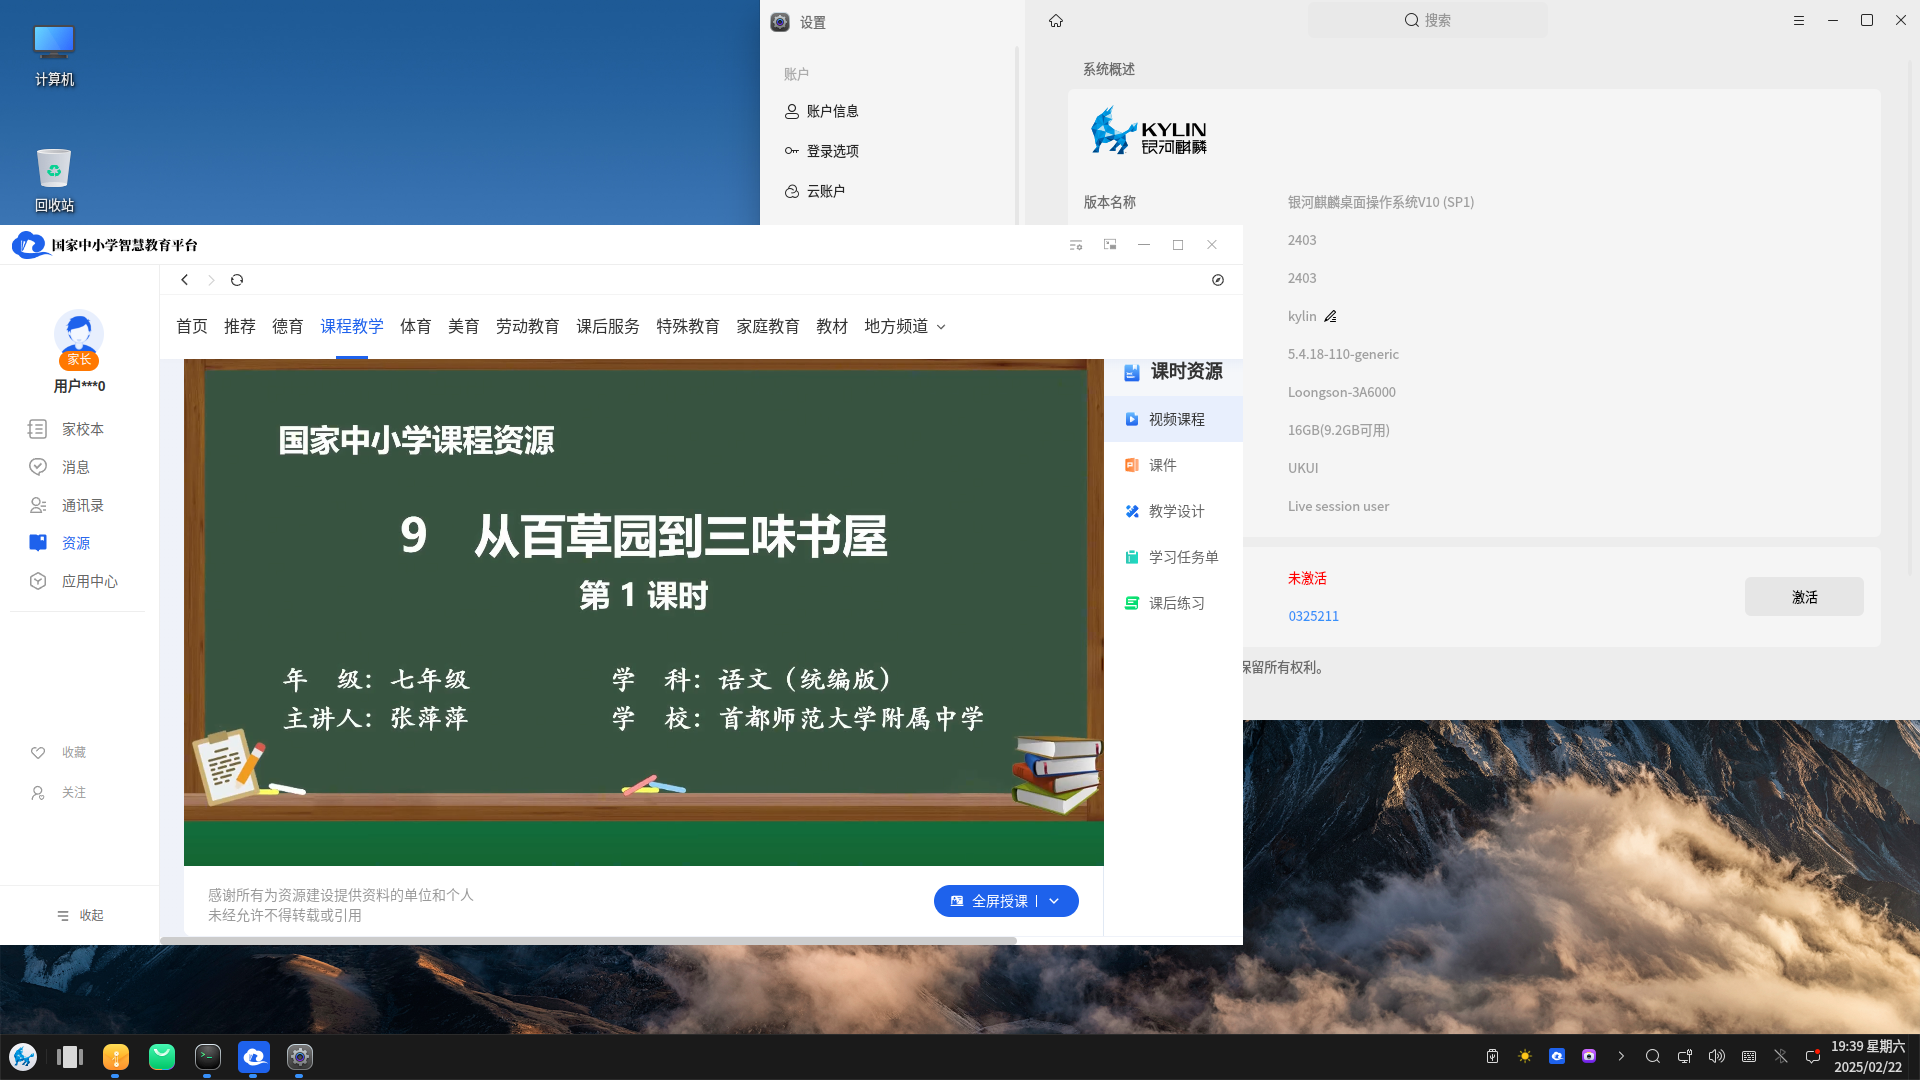
6.2. Kylin 2403 系统(旧世界)

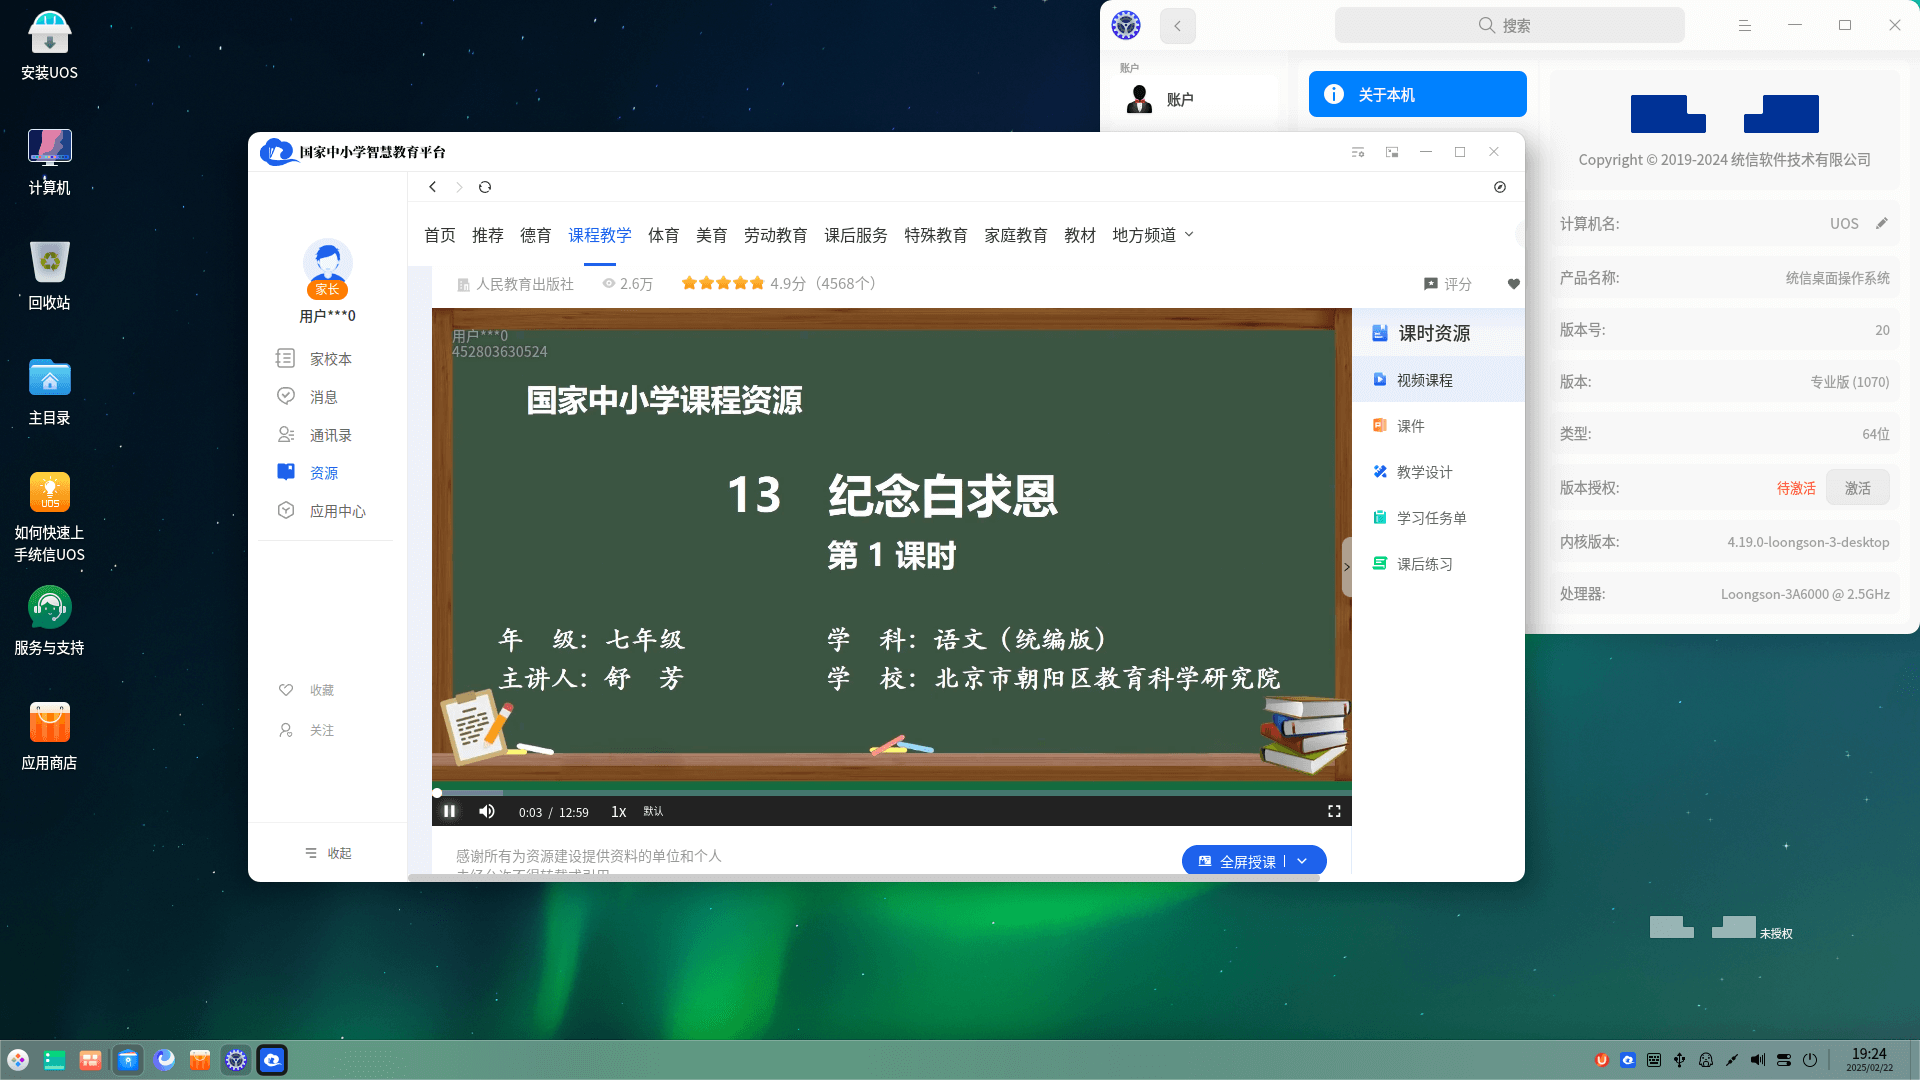
6.3. UOS 1070 系统(旧世界)

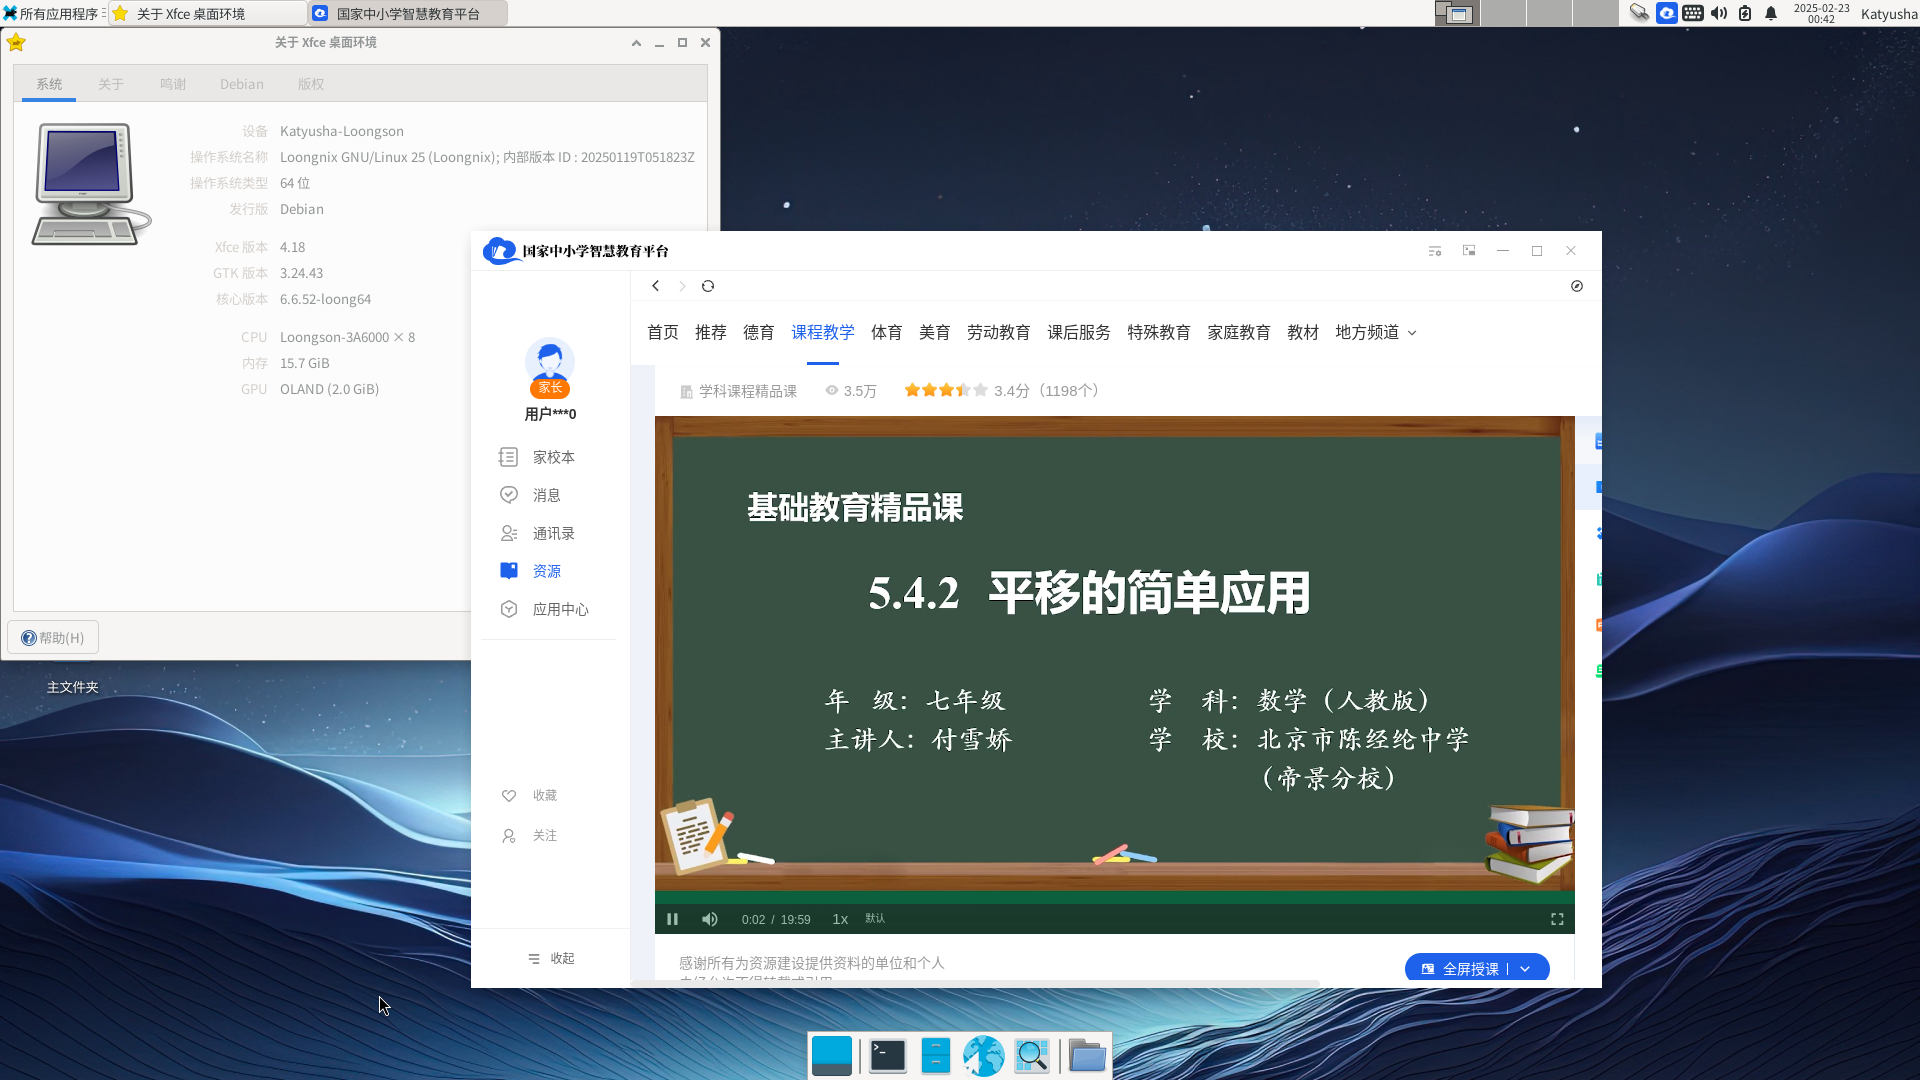
6.4. Loongnix 25 系统(新世界)

7. 附件